Wednesday, December 31, 2008

New Years Resolutions

Happy New Years Eve! I love the beginning of a new year, there is something so refreshing about a fresh start. I know that you can make resolutions and changes anytime of the year, but what better time then the beginning of a whole new year? I have never been very good at remembering or following through with my resolutions, and I am probably not the only one. This year I am trying to be easy on myself where my resolutions are concerned. I am having a baby in the next few weeks, so it is probably a good idea. This year I am trying to enhance my life by being more consistent with the things that I should do and enjoy doing. To help track my progress I am making a chart to go on the refrigerator. It has a striking resemblance to a chore chart, but really who likes chores, and these are things that I enjoy doing and make my life better. I find it easier to see exactly what I want to do, and have a way of tracking if I have accomplished it on a day to day basis. Just remember that if you slip up and fall of the resolution horse, tomorrow is a new day.


Feel free to print out my resolution chart and fill in your own goals on the left side.

One of my resolutions is to be better about keeping up my blog. The last few weeks have been crazy and I have fallen into a blogging blah. We got snow, and were house bound for a week or so, then Christmas and now New Years. But I love that this blog is a place for me to share the things that I love. So keep coming back, I promise to keep sharing the things that make my life extra special, and a little bit heavenly.

Thursday, December 18, 2008

A Cup of Christmas Tea

This is my all time favorite Christmas story, and one of my favorite stories ever! My Mom first read this in a magazine years ago. She ripped it out and we kept it. We were so excited when we found a book of this story on QVC. Sometimes QVC has amazing finds!

This is a great Christmas tradition in our family. My Mom and I always sit in front of the Christmas tree and read this story on Christmas Eve. We have read it so many times that I have it memorized. When ever I think of it, it evokes warm feelings of the true spirit of Christmas.

The story shares the experience of a man who receives a letter from his Great Aunt asking him to come visit and share some a cup of Christmas tea with her. He is reluctant to take time out of his schedule to spend time reminiscing with an old relative. When he finally gives in to visit her, he rediscovers the true meaning of Christmas that he has been missing in his life.


This a an amazing Christmas story. If you are looking for a great tradition to start with your family, this is it!

Thursday, December 11, 2008

Somethings don't turn out the way you plan!

Have you ever made something knowing that it was going to great, followed the directions to a T and when you get the final product, DISASTER! I had one of those experiences this week and unfortunately it killed my confidence for the week. I don't have very many of scary cooking experiences, so when they happen I am always taken by surprise.

We have an "Iron Chef" type party with our neighbors every month. This month our secret ingredient was mint. I was so excited because I was going to make Candy Cane Pie. My mom had made this a few time years ago, and it was super yummy. I whipped it up late in the afternoon before the party, that is when disaster struck. Things just didn't seem to be going good from the start, but I kept pressing forward, hoping it would all come together in the end. Well, it didn't come together and by I got to the end I knew it was not going to work. I scooped my pie filling into the crust, set it aside to cool, and started to cry. Still now I don't know what happened. My fluffy yummy filling was more the consistency of snot, sorry there is no other way to describe it. There is no fixing or covering up something that bad.

My poor husband had to come home to my broken heart and disgusting pie. Soon enough he get me smiling again and he remedied the situation by whipping up some brownies and tossing in Andes mint's chips into it. Thanks Sweetie! Have you ever had a horrible cooking disaster? Did you know where you went wrong, or was it a complete surprise? Let me know. It is good to know that these things happen to the best of us.
The is my my beautiful "snot pie" in all it's glory!

Monday, December 8, 2008

Crock-pot Southwest Black Bean Chicken

Good Monday morning!

We had a very busy weekend and now I am ready to tackle another busy week full of Christmas activities and baby preparations. As things are getting busier and closer to the arrival of our little man I am searching for more ways to save time. One of the best ways I have found to free up time is to let the crock-pot do the cooking for me. I love the idea of tossing the food in and letting it cook all day, and not having to worry about it.

This is one of our favorite crock-pot recipes. We have tried several variations of this recipes, some involving cream cheese, some involving shredding the chicken and other things. After trying them all this is our favorite, it is the right combination of everything. It is so delicious and so easy, and we are always so excited about how yummy it is.

Picture courtesy of The Sister's cafe


Crock-pot Southwest Black Bean Chicken

1 small bag frozen corn or 1 can of corn
1 can black beans
2 large frozen boneless skinless chicken breasts
2 cups of salsa-if you want spicier, add a hotter salsa
shredded cheddar cheese
tortilla chips
sour cream
chopped cilantro
diced avocado
diced tomatoes

If you are using frozen corn place it on the bottom of the crock-pot, then place chicken on top. If you are using canned corn place the chicken on the bottom of the crock-pot, and then the corn on top of the chicken. Then add drained black beans and salsa. Cook on high for 1 hour, and then on low for 4 hours. Shred chicken with forks, mix back in with black bean mixture. Serve with tortilla chips and add toppings to individual servings. Eating with tortilla chips really gives it the best taste, it is the salt and the crunch.

We have a small crock-pot, so we down size the recipe for our needs. It is not an exact science, so we do several small chicken pieces that fit in the crock-pot and the regular amount of corn, black beans and salsa. The little crock-pots only have an on/off setting, usually about 4 hours is the perfect amount of time to cook.

Friday, December 5, 2008

Fabulous Find- Peppermint Ice Cream


One of my favorite parts about any holiday is the food associated with it. One of my favorite Christmas time foods is Peppermint Ice Cream. Creamy ice cream and crushed candy cane pieces are the perfect combination. This ice cream is great paired with brownies, sundaes or right out of the carton. I always get so excited when I see this holiday favorite waiting in the frozen food aisle. It is so yummy. Give it a try, I know you will love it!

Tuesday, December 2, 2008

Cream Cheese Stuffed Cinna-Bun Pull-Aparts


I made these months ago, and never posted the recipe. These are so yummy. I brought them to ladies get together, and everyone raved about them. Everything about these are perfect. I placed a piece of aluminum foil under the pan to catch any drips, but be sure not to use a cookie sheet. Also, make sure you cover the top as instructed. Mine took closer to 45 minutes to cook so keep an eye on them. Invite people over to help eat these, they are so addicting that you might want to eat them all.


Cream Cheese Stuffed Cinna-Bun Pull-Aparts


20 Rhodes Bake and Serve Rolls, thawed
1 lb. light brown sugar
2 sticks unsalted butter
4 Tbsp. cinnamon sugar
8 oz. cream cheese (at room temperature)

In a bowl, combine cream cheese with ¼ cup brown sugar and combine well with spatula. Cover and place in refrigerator.
Lightly coat bottom of bundt pan with cooking spray.
Melt butter, then add remaining brown sugar and stir well. Bring to a light boil to caramelize then pour 1/3 of the butter/brown sugar mix across bottom of bundt pan.
Remove cream cheese mix from refrigerator. Take one roll at a time into your hands and pull outward on sides to increase size slightly. Place approximately 1 Tbsp. of the cream cheese mixture into middle of roll. Fold dough around the mixture, pinch closed, then roll into a tight ball.
Evenly place 8 balls across bottom of bundt pan. Sprinkle with 2 Tbsp. of sugar/cinnamon. Pour second 1/3 of the brown sugar/butter mixture over 8 buns. Repeat process with remaining 12 dough balls for second layer. First the dough balls, 2 Tbsp. sugar/cinnamon and finally the remaining butter/brown sugar mix.

Let rise for 30 minutes to 1 hour then bake for 45-60 minutes at 350°. You will need to lay a piece of foil over top of pan after about 40 minutes when the buns start looking browned.
Remove from oven then immediately turn over onto large plate. Remove bundt pan. Serve warm or room temperature.

Wednesday, November 26, 2008

Black Friday Shopping Tips

I love Black Friday, I am no sure why, I just do. There is just something electric in the air. The beginning of everything Christmas, the excitement of a killer deal, gets me excited just thinking about it. Don't get me wrong though there are some things I don't love about Black Friday too. By the end of the morning I feel so over stimulated that I can barely function. So many people, usually women, means way too much estrogen. Some women take this shopping day way too seriously and if you get in their way, watch out sister, she'll take you out.

So if you have weighed the pros and cons of Black Friday and decided that you are going to brave the insanity, don't go ill prepared. This crazy shopping day can go from bad to worse very quickly, so be prepared. Here are some of my tried and true tips to make it out of the Black Friday rush alive, only a little battered, and most importantly a trunk full of Christmas goodies!

1. Dress in layers- It usually starts out pretty cold early in the morning, but as the hours progress you will get warmer, especially driving a cart like a race car driver. You will want to be able to easily remove layers as you go, for optimal comfort. If you are going to a super crazy store like Wal-Mart(which I have never have and never will enter on Black Friday), try to leave your coat in the car. With so many people the last thing you want to worry about is carrying your coat around.

2. Wear comfy shoes- You would think that this would be obvious, but it is not. This is definitely a time to put comfort over fashion. I have seen women hobbling around a store and feel so sorry for her knowing that she has a morning of pain and suffering ahead of her.

3. Bring a list & the add- Organization is key in a successful shop. You don't want to wander around the store going through the same aisle 5 times getting things you forgot you wanted. For each individual store have a list of exactly what you want to purchase, including sizes that you need. For that store bring along the add. You want to have the add in case you need to double check a price or see exactly it was that you wanted. Mark the item that you want boldly with a sharpie and or highlighter, so you can find it easily filling through the add.

4. Bring a Buddie- If at all possible bring a friend of family member with you. Good company always seems to lighten the stress. It is also great to have an extra shopping team mate with you. You can break up the shopping list and divide and concur the store. It is also a great way to speed through the line. One person stands in the inevitably long line, while the other person finishes the shopping. With 2 people there is no need wait until you are completely done shopping if there are long lines.

5. Bring snacks- Shopping takes a lot of energy! Come prepared for the morning dip in blood sugar with snacks. You will regret it if you don't when your tummy starts to growl and all you have is a credit card. I love to go to Fred Meyer because they provide the snacks. They always has hot chocolate, cider, doughnuts and fruit.

6. Listen to Christmas music- Nothing makes me feel Holly and Jolly like Christmas music. Enjoy the spirit of the season by cranking up the tunes. If you dare you can even sing along. Sing- a-longs always lighten the mood, right?

Well I hope that your Black Friday shopping experience is a success and you come home happy and satisfied with your amazing bargains!

Tuesday, November 25, 2008

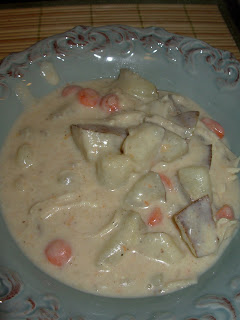
Creamy Chicken Potato Soup

Hello- I am glad to get back into the swing of crafting and cooking.

As part of the new and more organized meal planning that I am doing, I am adding more soups to my cooking rotation. I guess it is technically still fall, but it feels like winter, and that cool winter air makes me long for a pot of soup simmering on the stove.

This recipe originally came from The Sisters' Cafe Blog, but I made a few changes to make the recipe my own. This recipe was very easy, just a lot of chopping and simmering. My husband loved it, and said that it ranked right up with the other soups that I make.


Creamy Chicken Potato Soup

lb chicken (breasts or combination)
1 onion, diced
6 slices of bacon
2 handfuls baby carrots (about 2 cups sliced small)
4-5 potatoes, diced small
1 c milk
1/4 c flour
8 oz package cream cheese

1. Put chicken in pot and cover with water; boil until cooked. Take chicken out of water but keep the broth. When chicken is cool, shred.
2. Fry bacon in the pot you will be using for the soup. Fry bacon until crispy. Remove bacon and saute' onions in bacon drippings. Add carrots and potatoes. Add 3-4 cups of broth or enough to cover vegetables. Add bouillon cubes or soup base for flavor (I add 4 bouillon cubes). Bring to a boil and simmer until veggies are tender.
3. Mix flour with milk and add to soup. Add chicken and cream cheese into the soup mixture. Slightly soften cream cheese in microwave, then add to soup in little pieces.Simmer until melted and well combined. Add in crumbled bacon. Season with salt and pepper.

Thursday, November 20, 2008

Bajio Chicken Chile Salad

I am sure that you thought that I had fallen off the face of the earth, nope I've just been sick. The only thing I think that is worse than being sick, is being pregnant and sick. It seems that as soon as I start thinking I'm better, the next day I am feeling horrible again. So feeling better or worse I was determined to get something posted this week.

This recipe comes from a site that I love. Leigh Ann at Your Homebased Mom is amazing! She has yummy recipes that I love and tons of fun decorating and holiday ideas.

There are 2 reasons that I wanted to try this recipe. First, I have heard great things about the Chicken Chile Salad from Bajios. Sadly I have never had it, but my friend and favorite neighbor from Rexburg loves it. The second reason, it is a crock-pot recipe. With our baby coming soon and the weather cooling off, nothing seems easier and nicer than dinner making its self on the counter. This recipe was so easy that I actually gave it to my husband and he put it together while I finished getting ready for church.

This Chicken Chile was so wonderful. Having never tried the real Chicken Chile I have nothing to compare it to, but Leigh Ann says it's right on with the real thing. And as far as I am concerned, even if it doesn't taste like the original, it tastes so good, why would it matter? Leigh Ann used the chicken as a topping on a salad, like at the restaurant. I found that my lettuce was looking a little sad, so we made burritos for dinner and quesadillas the next day with the leftovers. I am pretty convinced that you could put it on just about anything and it would be great.

So without further ado, here is the recipe. Try it out, and let me know what you think.


This is out burrito. Sorry it's not as beautiful as Leigh Ann's picture.


Bajio Chicken Chile Salad

5 chicken breasts (I only used 4 large ones)

1/2 cup salsa

1 Tbsp cumin

1/2 cup brown sugar (more to taste)

1 4 oz. can diced green chilies

6 oz. Sprite (1/2 can)

Combine all ingredients in a crock pot. Cook on low for 5-6 hours. Remove chicken and shred. Return to crock pot and cook 1 more hour. Thicken the juices with a little cornstarch mixed in water.

Serve with flour tortillas, lettuce, cheese, black beans and any other taco fixings.

If you want it spicier rather than sweeter add a hotter salsa and more green chilies.

Wednesday, November 12, 2008

Thankful Banner


This beautiful banner is perfect for fall time. The "Thankful" letters are textured and raised. Banner comes fully assembled and ready to hang. Banner is $25.00, plus $5.00 shipping


Tuesday, November 11, 2008

Fabulous Find- Stephen's Candycane Cocoa


Hot chocolate is one of my favorite things, not matter what time of year. I always enjoy grabbing a mug filled with yummy warm hot chocolate. Last week I found something wonderful that satisfied my need for hot chocolate beyond expectations.

Stephen's is one of the best hot chocolate makers as far as I am concerned, and this could possibly be there best cocoa. Candycane Cocoa is so yummy, and yes it actually has candycane's in it! Who ever came up with that should get a big raise. When I was younger Santa would always put packets of specialty hot chocolate in our stocks, and my favorite was always mint chocolate. I am not sure what it is, but I think that mint and chocolate go together better than peanut butter and jelly.


Last night my husband and I flipped on the fireplace and enjoyed some amazing Candycane Cocoa. With a dollop of homemade whipped cream, nothing could be better.

Find some Stephen's Candy cane Cocoa and give it a try. You will be hooked, I promise! If you can't find it at your local store, check out there website- www.stephensgourmet.com

Sunday, November 9, 2008

Cookie Monster

Me want cookies! I really love these cookies. This is one of the things that I miss most about Rexburg. One of our favorite places to eat was Craigo's. Craigo's specialty is pizza, which they do amazingly well, but there desserts are out of this world. I am sure that most dates that share a Cookie Monster end in eternal bliss. Well maybe that is a bit of an exaggeration, but it is almost that good.

The Cookie Monster is simple, yet profound. It is a giant cookie topped with vanilla ice cream, whipped cream, caramel and hot fudge. We had a craving for some Cookie Monsters, so we invited some friends over that also went to BYU-Idaho.

I was able to find the perfect dish for our Monsters at Michael's. They are ceramic pie dishes that are about 9 inches across. One dish was the perfect portion for 2 people. I whipped up some of my Mom's wonderful chocolate chip cookie dough, recipe to come another time, and patted it down in the bottom of the pan.


The "giant cookie" baked for about 15 minutes, until it was just browned on the edges and cooked in the middle.


After the cookie came out of the oven I let it set for about 10 minutes. It is really important to let the cookie cool enough so your ice cream doesn't melt, but at the same time you want the cookie to be warm when you eat it. I was a little excited and added the ice cream too soon and it melted a little too much.


Top your cookie and ice cream with whipped cream and chocolate and caramel. Sorry there is no chocolate or caramel in the picture. I was too excited to start eating that I didn't bother taking a picture, so you will just have to imagine it there.

Thursday, November 6, 2008

Molasses Gingersnaps

It is another cold, rainy day here in Seattle. I am ready to start hibernating. To warm things up a little bit I decided to make a batch of some of my favorite cookies.

I got this recipe from Family Fun magazine, and it has been a winner. I was searching for a good combination of a molasses cookie and a gingersnap, something smooth from the molasses and spicy from the ginger, and this is it. It is soft and chewy, yet crunchy on the edges. Aside from the great cookies, now my house smells like warm gingerbread. YUM

The woman who submitted this recipe told a the great story about how she got the recipe. It was her Great Aunt Erma's, and they would always make them together. Her Aunt Erma passed away several years ago, but when she pulls out the recipe card and looks at the recipe, lovingly written by Aunt Erma, she feels like she is right back in her kitchen. I love how cooking brings people together and creates such amazing memories.


Molasses Gingersnaps
3/4 cup shortening
1 cup brown sugar
1/4 cup molasses
1 large egg
2 cups flour
2 teaspoons baking soda
1/4 teaspoon salt
1 teaspoon cinnamon
1 teaspoon cloves
1 teaspoon ginger
1/2 cup sugar(for rolling cookies in)

1. Cream shortening, brown sugar, molasses and egg
2. Blend together dry ingredients
3. Add dry ingredients to the creamed mixture, blending after each addition, until the dough is evenly mixed
4. Heat oven to 375
5.Roll scoops of dough in sugar, place on lightly greased cookie sheet
6. Give a slight pat with the spatula to flatten slightly
7. Bake 8-9 minutes.
8. Cool on baking sheet for 1 minute before transferring to cooling rack.

Makes about 2- 2 1/2 dozen cookies

Tuesday, November 4, 2008

Amazing Apples


I have found a new love this fall. I am in love with Honeycrisp apples. I had never heard of these before we moved to Seattle, and now I can't believe that I have lived without them. Aside from the fact that these apples are beautiful, they are super tasty. These apples are sweet, but not too sweet and have a great crisp texture. They are a little more expensive then your regular run of the mill apples, but I just keep an eye out for a sale. If you have seen these and never tried them, give them a chance, you won't regret it!

Friday, October 31, 2008

Happy Halloween Everyone!

I am very excited for Halloween today. Ever since I was little, Halloween has felt like just a "warm up" to a wonderful holiday season. My Mom has always embraced holidays 150%, and that is what has led to my love of them. At my Mom's house you can expect at least 100 trick-or-treaters, usually closer to 200 and sometimes 250. My Mom puts together little goodie bags full of candy and decorates her yard. When I was visiting her a few weeks ago I took some pictures of her yard decorations. I wish I could decorate like this, but I don't really have the room, since we live in an apartment. I am sad to say that we have been so busy that this year we didn't even get pumpkins carved.


Well off I go. Time to get ready for our annual Halloween costume party!

Thursday, October 30, 2008

Bourbon Chicken

This is one of my favorite chicken dishes. Back when my husband and I were poor newlywed college students, actually that was only 6 months ago, we made this all the time. This is quick and easy to make, and I always have the ingredients on hand.

I got this recipe on a great website called Recipezaar. If you haven't been, there check it out! It is full of great recipes that everyday people post and you can rate them after you try them. My 2 favorite features are that you can search for a recipe and then look at the results with the highest rating and you can change the portions you need and then it changes the measurements for you, what a help.

No there is no Bourbon in the recipe. When I first found it on Recipezaar someone had given it a lower rating because there was no Bourbon in the recipe and it was in the name, and that was misleading. Don't be fooled. No Bourbon, just yummy chicken!


Bourbon Chicken
1 lbs boneless chicken breast, cut into bite size pieces
1-2 Tablespoons olive oil
1 garlic clove, crushed
1/4 teaspoon ginger
1/4 cup juice(Orange, Apple or Pineapple work great)
1/3 cup brown sugar
1/3 cup soy sauce
1/2 cup water
1 Tablespoon cider vinegar
2 Tablespoons ketchup
a few dashes of cayenne pepper

-Heat oil in large skillet, add chicken and cook until browned
-Remove chicken
-Add remaining ingredients, heat over medium heat until well mixed and dissolved
-Add chicken back in and bring to a Hard Boil(This is key, it needs to be a hard boil so it will thicken later)
-Reduce heat and simmer for 20 minutes
-Serve over hot rice and enjoy!

Wednesday, October 29, 2008

Gratitude Journal

What is it about the fall time that makes me feel so grateful for the abundance in my life? My extreme gratitude started a little early this year, somewhere around the beginning of September. I had spent the summer in the first trimester of my pregnancy, and was starting to feel really good. When one day I told my husband that honestly I had had a pretty easy pregnancy and that I felt very blessed to be pregnant, and in the end it would all be worth it. Much to my surprise when I finished, my husband repeated what I had said word for word to make sure that he had typed it right. What you wrote down what I said? He was using the laptop and decided to save what I had said, so I would remember that I said I enjoyed being pregnant. It was then that I realized that I had been complaining a little too much, and really I had nothing to complain about. I am so blessed!

It was then that I decided that I needed to be more grateful! Every single day there are things that I take for granted. I don't want to spend my life complaining and not realizing what I have. So to help my self remain more focused on the blessings in my life, I have decided to start a gratitude journal.

A gratitude journal is not just a regular journal, it is devoted strictly to things that you are grateful for. Spending time everyday focusing on what you have and how you are blessed helps to keep you centered and help you realize how much you really do have.


My beautiful gratitude journal has been embellished with ribbon and chipboard. On the inside there is a quote about gratitude. Reading it puts me in a better frame of mind to recognize how blessed I am. On the top of every page there is a reminder of why I am keeping a gratitude journal. I have stamped phrases like, Today I am grateful for..., I have been so blessed by....,and I have so many things in my life to be thankful for...

What a wonderful time to start a Gratitude Journal! I love the change that I see in myself when I am more grateful. Start a journal today, I promise that you will love it too. If you would like me to make you a very special Gratitude Journal, just let me know, I would love to!

Tuesday, October 28, 2008

Pumpkin Whoopie Pies


Last night our friends had a little pumpkin themed get together. This gave me the opportunity to try out a new pumpkin recipe that I have been longing to try. I was also hoping to make some mini pumpkin pies, but I was out of eggs and my car battery was dead, so everything got postponed until later in the day, leaving time just for the cookies.

This is a Racheal Ray recipe, and it was a huge hit! I was really nervous throwing a new recipe together just minutes before we went to our friends, but this was quick, easy and very delicious.

Preheat oven to 350. In a large bowl, whisk together the melted butter and brown sugar until smooth. Whisk in the eggs, pumpkin puree, pumpkin pie spice, 1 teaspoon vanilla, the baking powder, the baking soda and 3/4 teaspoon salt. Using a rubber spatula, fold in the flour.

Using an ice cream scoop or tablespoon, drop generous mounds of batter, spaced evenly, onto each baking sheet. The recipe says it makes 12 pies, I got about 18, it just depends how big your scoop is. The dough was a little wetter then it seemed it would be, but I trusted Rachael, and they turned out perfect. Bake until springy to the touch, about 10 minutes. Transfer to a rack to cool completely. We were in a bit of a time crunch, so we set them outside for a few minutes, and they cooled of very quickly.

Meanwhile, using an electric mixer, cream the softened butter with the cream cheese. Add the confectioners' sugar and the remaining 2 pinches salt and 1/2 teaspoon vanilla; mix on low speed until blended, then beat on medium-high speed until fluffy, about 2 minutes.

Spread the flat side of cakes with the cream cheese frosting. Top each with another cake.


A special thanks to my husband who snapped the pictures while I was busy baking and getting ready to go. Thanks sweetie!


Pumpkin Whoopie Pies
1 1/2 sticks (6 ounces) unsalted butter, 1 stick melted, 1/2 stick softened
1 cup packed light brown sugar
2 large eggs, at room temperature, lightly beaten
1 cup canned pure pumpkin puree
1 tablespoon pumpkin pie spice
1 1/2 teaspoons pure vanilla extract
1 teaspoon baking powder
1 teaspoon baking soda
3/4 teaspoon plus 2 pinches salt
1 2/3 cups flour
4 ounces cream cheese, chilled
1 cup confectioners' sugar

Sunday, October 26, 2008

Halloween Garland


I have seen these floating around on blogs and I decided to jump on the wagon too. It was super simple and I think that it looks great on our fireplace.

I cut the silver card stock and then decided to add paper on top of that to make it look a little more Halloweenish. I am really glad that I did, it made all the difference.


Then I added the letters on top of that.

I decided to tie each letter together individually. It added ribbon in between each letter, which I like, because if you string it together on one piece you run the risk of them sliding together when it's hung up.

This ended up taking a little more time than I thought it would, but I think it was worth the time. If you decide to give it a try, let me know how it turns out!

Thursday, October 23, 2008

Pumpkin Tin (Jack-O-Bucket)


I couldn't figure out a name that described this perfectly, so my husband named this Jack-o-bucket. I found these buckets with faces cut out of them at a thrift store. The paint job was pretty ugly, but the cut out part had potential. I played with a little Mod Podge and paper, and this is what I got. I am so glad that I gave this little tin a second chance at a better looking life.

This is the tin that I started off with, not much to look at is it?

I layed the paper over the tin, pressed down the edges to make an imprint. Then I cut along the imprinted edge. After I had the front section cut I held the paper over the front and traced the face from the inside. Then I cut out the face. To apply the paper just put a layer of Mod Podge on the tin, lay the paper on and smooth so there are no air bubbles. Then apply another layer of Mod Podge on top to seal. Easy as that!

I tossed a tea light in and I am happy that the tin is just as cute with the lights out as it is with them on.

Wednesday, October 22, 2008

Chocolate Chip Pumpkin Spice Bars


I made these bars a few weeks ago for a lunch get together, and they were amazing. I cut the recipe in half, because it yields 42 bars, and there is no way that we could eat that much. I got the recipe from www.therecipegirl.blogspot.com and she got it for Ms. Betty Crocker. They are a perfect fall treat.

BATTER:
1 ¾ cups pure pumpkin puree
1 cup canola oil
4 large eggs
1½ cups granulated sugar
½ cup brown sugar
1 cup all-purpose flour
1 cup whole- wheat pastry flour
2 tsp baking powder
2 tsp ground cinnamon
1 tsp baking soda
½ tsp salt
½ tsp ground ginger
¼ tsp ground cloves
¾ cup mini- chocolate chips

FROSTING:
8 ounces cream cheese, softened
4 Tbs butter, softened
2 tsp milk
1 tsp pure vanilla extract
4 cups powdered sugar, sifted
½ cup mini- chocolate chips (for topping)

1. Prepare batter: Preheat oven to 350°F. Spray 10x15-inch baking pan with nonstick spray.
2. In a large bowl, whisk together pumpkin, oil, eggs and sugars until combined.
3. In a separate bowl, whisk together flours, baking powder, cinnamon, baking soda, salt, ginger and cloves. Toss in mini chocolate chips and stir to combine. Add dry ingredients to the wet and stir until moistened.
4. Pour batter into prepared pan coated with nonstick spray. Bake until the center springs back when lightly pressed in the center- about 25 to 30 minutes. Remove and place on wire rack to cool completely.
5. Prepare frosting: In a large mixing bowl, beat together cream cheese, butter, milk and vanilla. Slowly add the powdered sugar, 1 cup at a time, and mix until smooth. Frost bars and sprinkle with additional mini chocolate chips.
Yield: About 42 bars

Monday, October 20, 2008

Framed Polka Dot Witch Silhouette!

I am so excited about posting my first project to sell! I am completely in love with this item. Just in time for Halloween, it is a fabric witch silhouette on canvas in a unique hand painted black frame. The canvas is painted a "pumpkin orange" and the witch is made from a black fabric with small white polka dots. The frame measures 14 inches by 11 1/2 inches, with the canvas being 8 1/2 by 11 inches. Ready to hang on any wall in your home. This is so simple, yet makes a stunning statement!


Framed Polka Dot Witch Silhouette is $15.00 plus $5.00 shipping.


Friday, October 17, 2008

Quilt Giveaway!

I came across something amazing this morning and I am so excited to share it with you. Believe it or not it is a quilt giveaway! I cannot imagine that someone could give away something like a homemade quilt. But the lady who made it is excited and I am excited too. The contest ends tonight, so hurry quick. All you need to do is leave a comment and you are entered, it is that easy!

http://pigtailsandsnails.blogspot.com/2008/10/quilt-giveaway.html

I hope one of you are lucky enough to win!!!

Thursday, October 16, 2008

Halloween Invitation


Every year my husband and I have a Halloween party. Actually this is only our second Halloween being married, so the fact that we have had one BOTH years makes it every year. We love getting together with our friends in silly costumes and having a great time. Last years party was a bit of an after thought in the planning department, so this year I got started early because I wanted something very fun. After looking through magazines and online, this is my creation. I loved the idea for a 3D card, and the pom-pom spider with the google eyes looks so cute and friendly. They were super simple to make and seem to be a big hit. The invitations were accompanied by a little baggie of cookies, who can say "no" to a party invitation like that!

Tuesday, October 14, 2008

Fabulous Find: Butter Bell


This fabulous find is something that I have loved for years. I have always wanted one, and I finally got one for my birthday this year. Now, I wonder how I ever lived without my Butter Bell!

A Butter Bell stores butter in a bell that goes in a beautiful dish with water in it, creating an air tight seal around the butter. It keeps butter fresh, delicious and perfectly spredable for up to 30 days without refrigeration. Aside from how practical the Butter Bell is, it is beautiful! My wonderful husband gave me a red Butter Bell to match my kitchen accessories. The Bell's come in all different colors, Christmas and holiday themed and even pink in support of Breast Cancer awareness month. This is a beautiful and extremly usefull gift, remember Christmas is right around the corner.

Butter Bells are a fabulous find, check them out at www.butterbell.com

Monday, October 13, 2008

Broccoli Cheese Soup


On the cool crisp days of fall there is nothing like a great bowl of soup to warm you up. Broccoli Cheese Soup has always been a favorite soup of mine, and I finally found a soup to make at home that has everything that I need. This soup is cheesy and cream and perfect with a piece of French Bread. And to top it all off, it is super easy!

Broccoli Cheese Soup

1 1/2 pounds fresh broccoli or 20 ounces frozen
3 Tablespoons butter
1/4 cup chopped onion
3 Tablespoons flour
2 cups chicken broth
2 cups cream
1 teaspoon salt
1 cup grated cheddar cheese

1. Cook broccoli in a small amount of salted water until tender
2. Melt butter in heavy sauce pan
3. Add onion and cook until clear
4. Stir in flour to make roux
5. Slowly add broth and cream. Stir and cook until thickened.
6. Add salt and cooked broccoli
7. Just before serving, stir in cheese

Makes 6 servings

Friday, October 10, 2008

Welcome Welcome Welcome

Hello Everyone!

I am so excited about this new adventure. This blog was born out of my desire to create beautiful and wonderful things for my family and friends. I love to cook, scrapbook, sew, paint and do just about anything crafty. I hope to be able to share craft projects, recipes, scrapbook pages, sewing ideas, holiday inspirations and decorations and other projects for you to enjoy as well. I will also offer things that I had made that can be purchased. I hope that you enjoy visiting often and sharing in my passions.